Authentication
Overview
With SailPoint's IdentityNow (IDN) APIs, you can extend your IDN platform far beyond its current capabilities.
To be able to do so, you must first authenticate to the IDN APIs. Authentication is the act of validating a user's identity, generally by passing some kind of credentials. A fast, simple way to authenticate to the APIs is to generate a personal access token and pass that token.
If the PAT is valid, the API responds with a JSON Web Token (JWT) access_token that you can provide to authorize your API requests.
Authorization is the act of validating the user's permission to access a given resource.
A successful API request must include the access_token in the Authorization request header.
This JWT access_token grants access matching that of the user who generated the PAT.
For example, if the user who generated the PAT is an admin, the returned JWT access_token would grant admin access to the APIs.
This diagram shows the flow of this authentication/authorization process:
The flow involves these four key steps:
- Access Token Request: The HTTP client (a script, application, Postman, cURL, etc.) makes a request to IDN to get a JWT
access_token. - Access Token Response: If the request is valid, IDN responds to the HTTP client with a JWT
access_token. - API Request: The HTTP client makes a request to an IDN endpoint with the header,
Authorization: Bearer {access_token}. - API Response: If both the request itself and the JWT
access_tokenin its header are valid, IDN responds to the client. If you encounter unexpected errors, refer to the Troubleshooting section of this document.
The idea is that once you have authenticated to the IDN APIs and you have received an access_token, you can use that access_token to provide authorization for your API requests.
This document includes all the information you need to know to engage in this authentication/authorization process, as well as a guide on how to get started.
Get started
Read this guide to learn how to authenticate to SailPoint's IDN APIs.
To authenticate to the IDN APIs, you must be able to connect to your tenant to send the access token request. To do so, you need to do the following:
- Find your tenant's OAuth details
- Generate personal access token
- Choose authorization grant flow
- Request access token
Find your tenant's OAuth details
Your tenant's OAuth details refer to the details you need to know to connect it to the APIs.
You need to know your tenant's name, its authorizeEndpoint URL, and its tokenEndpoint URL.
Your IDN instance is likely using the domain name supplied by SailPoint ({tenant}.api.identitynow.com), in which case, the tenant name is in the URL.
This is assumed to be the case in this guide.
However, if your IDN instance is using a vanity URL, you must enter this URL into your browser to get your OAuth info:
https://{tenant}.api.identitynow.com/oauth/info
If you have admin access but don't know your tenant name, you can learn it by following these steps:
- Log into your IDN instance.
- Select the 'Dashboard' dropdown.
- Select 'Overview'.
- Find the tenant name in the dashboard's
Org Detailssection.
If you don't have admin access and don't know your tenant name either, you can learn it by following these steps instead:
- Change your IDN URL to the following: `https://{your-IdentityNow-hostname}.com/ui/session, where {your-IdentityNow-hostname} is your company's domain name for accessing IDN.
- Find tenant name in the
baseUrlsession detail:https://{tenant}.api.identitynow.com
This is an example of the OAuth details of the tenant, "iga-acme-sb":
{
  "tenantId": "cc31a307-8a8d-49e8-93b9-c7cbe20e2e6b",
  "tenantName": "iga-acme-sb",
  "authorizeEndpoint": "https://iga-sb.acme.com/oauth/authorize",
  "tokenEndpoint": "https://iga-sb.api.identitynow.com/oauth/token",
  "cloudDomainUrl": "https://iga-sb.acme.com",
  "logoutUrl": "https://iga-sb.acme.com/logout",
  "pod": "stg01-useast1"
}
You can use the authorizeEndpoint and tokenEndpoint URLs from this example to test out the different authentication methods listed in this guide.
Generate a personal access token
A personal access token (PAT) is a method of authenticating to an API as a user without providing a username and password. PATs are primarily used in scripts or programs that lack an easy way to implement an OAuth2 flow but need to call API endpoints that require user context. PATs are also convenient for use in tools like Postman when you are exploring and testing the APIs.
Any IDN user can generate a PAT. To do so, follow these steps:
Select Preferences from the drop-down menu under your username, then Personal Access Tokens on the left. You can also go directly to the page by using this URL (replace
{tenant}with your IdentityNow tenant):https://{tenant}.identitynow.com/ui/d/user-preferences/personal-access-tokensClick New Token and enter a meaningful description to help differentiate the token from others.
The New Token button will be disabled when you reach the limit of 10 personal access tokens per user. To avoid reaching this limit, it is recommended that you delete any tokens that are no longer necessary.
- Click Create Token to generate and view the two components that comprise the token: the
Client IDand theClient Secret.
After you create the token, the value of the Client ID will be visible in the Personal Access Tokens list, but the corresponding Secret will not be visible after you close the window. Store the Secret somewhere secure.
- Copy both values somewhere that will be secure and accessible to you when you need to use the the token.
To generate a personal access token from the API, use the create personal access token endpoint.
Once you have created the PAT and you know its Client ID and Client Secret, you have everything you need to follow the Client Credentials Grant Flow and use the PAT to generate an access_token.
You will need this access_token to authenticate your requests to the APIs.
Choose authorization grant flow
There are several different authorization flows that OAuth 2.0 supports, and each has a grant-type defining its different use cases. You must choose the one that best serves your purposes. This document covers these three common flows:
- Client Credentials - Clients use this grant type to obtain a JWT
access_tokenoutside the context of a user. Because this is outside a user context, only a subset of IDN APIs may be accessible with this grant type. - Authorization Code - Clients use this grant type to exchange an authorization code for an
access_token. Authorization codes are mainly used by web applications because there is a login into IDN with a subsequent redirect back to the web application/client. - Refresh Token - Clients use this grant type to exchange a refresh token for a new
access_tokenwhen the existingaccess_tokenhas expired. This allows clients to continue using the APIs without having to re-authenticate as frequently. This grant type is commonly used together withAuthorization Codeto prevent a user from having to log in several times per day.
One way to determine which authorization flow you need to use is to look at the specification for the endpoint you want to use. The endpoint will have the supported OAuth flows listed under the 'Authorization' dropdown, like the List Access Profiles endpoint:
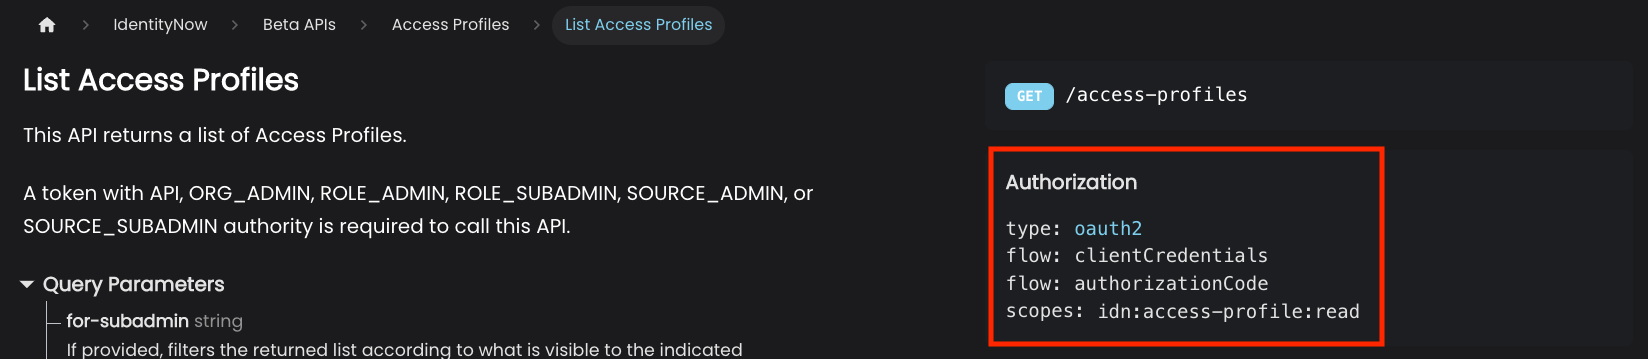
For more information about how to choose the best grant flow for your use case, refer to Grant Flow Use Cases
The guide will detail the three different authorization grant flows you can use to request the access token you need to authenticate your requests.
Request access token with client credentials grant flow
Clients use the 'Client Credentials' grant type to obtain access tokens without user context. This is probably the simplest authentication flow, but it has a drawback: API endpoints that require user level permissions will not work with them.
Personal access tokens are client credentials that have user context, so the API endpoints requiring user level permissions work with them. Which endpoints a personal access token (PAT) can be used to call depends on the permissions of the user who generated it.
An OAuth 2.0 client using the client credentials grant flow must have CLIENT_CREDENTIALS as one of its grantTypes (PATs are implicitly granted the CLIENT_CREDENTIALS grant type):
{
 "enabled": true,
 "created": "2019-05-23T02:06:20.685Z",
 "name": "My Application",
 "description": "My Application",
 "id": "b61429f5-203d-494c-94c3-04f54e17bc5c",
 "secret": null,
 "grantTypes": [
  "CLIENT_CREDENTIALS"
 ],
 ...
}
This is the overall authorization flow:
- The client first submits an OAuth 2.0 token request to IDN in this form:
POST https://{tenant}.api.identitynow.com/oauth/token
The request includes the client credential information passed in the request body, as shown in this example using Postman:
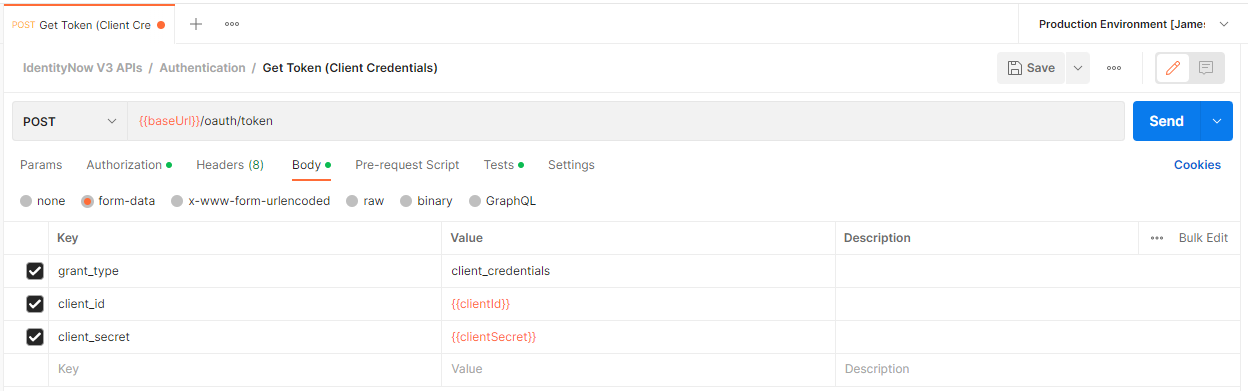
This example shows how to pass the information with form-data in the request body. You can also use these options to pass in the information:
- Use x-www-form-urlencoded data to pass in the client credential information in the request body.
- Use query parameters to pass the information in the request URL. The request URL will look like this:
https://{tenant}.api.identitynow.com/oauth/token?grant_type=client_credentials&client_id={{clientId}}&client_secret={{clientSecret}} - If you are using Postman, you can use the 'Authorization' tab to pass in the client credentials. If you use this option, you must also specify the access token URL: https://{tenant}.api.identitynow.com/oauth/token
The OAuth 2.0 token request must include this information:
| Key | Description |
|---|---|
grant_type | This is set to CLIENT_CREDENTIALS for the authorization code grant type. |
client_id | This is the API client's ID (e.g. b61429f5-203d-494c-94c3-04f54e17bc5c). You can generate this ID at https://{tenant}.identitynow.com/ui/admin/#admin:global:security:apimanagementpanel, or you can generate it when you create a PAT. |
client_secret | This is the API client's secret describing (e.g. c924417c85b19eda40e171935503d8e9747ca60ddb9b48ba4c6bb5a7145fb6c5). You can generate this secret at https://{tenant}.identitynow.com/ui/admin/#admin:global:security:apimanagementpanel, or you can generate it when you create a PAT. |
This example cURL command passes client credentials in the body as form-data to generate an access token:
curl --location 'https://{tenant}.api.identitynow.com/oauth/token' \
--header 'scope: sp:scope:all' \
--form 'grant_type="client_credentials"' \
--form 'client_id="{clientId}"' \
--form 'client_secret="{clientSecret}"'
- IDN validates the token request and responds. If the request is successful, the response contains a JWT access token. For more information about the JWT access token in the response, refer to #OAuth-token-response.
Once you have the JWT access token, you can pass the token as a basic "Authorization" header in your requests using the OAuth endpoints.
To learn more about the OAuth client credentials grant flow, refer here.
Request access token with authorization code grant flow
Further Reading: https://oauth.net/2/grant-types/authorization-code/
Clients use this grant type to exchange an authorization code for an access_token.
This is mainly used for web apps because there is a login into IDN with a subsequent redirect back to the web app/client.
The OAuth 2.0 client you are using must have AUTHORIZATION_CODE as one of its grant types.
The redirect URLs must also match the list in the client as well:
{
 "enabled": true,
 "created": "2019-05-23T02:06:20.685Z",
 "name": "My Application",
 "description": "My Application",
 "id": "b61429f5-203d-494c-94c3-04f54e17bc5c",
 "secret": null,
 "grantTypes": [
  "AUTHORIZATION_CODE"
 ],
 "redirectUris": [
  "http://localhost:8080/myApp/code"
 ],
 ...
}
The authorization code grant flow looks a little different because it involves the exchange of the access token and authorization code.
This diagram shows the authorization code grant flow:
This is the overall authorization flow:
The user clicks the login link on a web app.
The web app sends an authorization request to IDN in this form:
GET https://{tenant}.identitynow.com/oauth/authorize?client_id={client-id}&client_secret={client-secret}&response_type=code&redirect_uri={redirect-url}
IDN redirects the user to a login prompt to authenticate to IdentityNow.
The user authenticates to IDN.
Once authentication is successful, IDN issues an authorization code back to the web app.
The web app submits an OAuth 2.0 token request to IDN in this form:
POST https://{tenant}.api.identitynow.com/oauth/token?grant_type=authorization_code&client_id={client-id}&client_secret={client-secret}&code={code}&redirect_uri={redirect-url}
The token endpoint URL is {tenant}.api.identitynow.com, and the authorize URL is {tenant}.identitynow.com. Be sure to use the correct URL when you're setting up your webapp to use this flow.
- IDN validates the token request and submits a response. If the request is successful, the response contains a JWT
access_token. For more information about the JWT access token in the response, refer to #OAuth-token-response.
These are the query parameters in the OAuth 2.0 token request for the authorization code grant:
| Key | Description |
|---|---|
grant_type | Set this to authorization_code for the authorization code grant type. |
client_id | This is the client ID for the API client (e.g. b61429f5-203d-494c-94c3-04f54e17bc5c). This can be generated at https://{tenant}.identitynow.com/ui/admin/#admin:global:security:apimanagementpanel |
client_secret | This is the client secret for the API client (e.g. c924417c85b19eda40e171935503d8e9747ca60ddb9b48ba4c6bb5a7145fb6c5). This can be generated at https://{tenant}.identitynow.com/ui/admin/#admin:global:security:apimanagementpanel |
code | This is a code returned by /oauth/authorize. |
redirect_uri | This is the application URL to redirect to once the token has been granted. |
Here is an example OAuth 2.0 token request for the authorization code grant type.
curl -X POST \
 'https://example.api.identitynow.com/oauth/token?grant_type=authorization_code&client_id=b61429f5-203d-494c-94c3-04f54e17bc5c&client_secret=c924417c85b19eda40e171935503d8e9747ca60ddb9b48ba4c6bb5a7145fb6c5&code=6688LQJB0y652z6ZjFmkCKuBUjv2sTIqKS2JthWrZ7qlPgI9TClJ6FnpweEhO6w7&redirect_uri=https://myappdomain.com/oauth/redirect' \
 -H 'cache-control: no-cache'
Once you have the JWT access token, you can pass the token as a basic "Authorization" header in your requests using the OAuth endpoints.
For more information about the OAuth authorization code grant flow, refer here.
Request access token with refresh token grant flow
Clients use this grant type in order to exchange a refresh token for a new access_token once the existing access_token has expired. This allows clients to continue to have a valid access_token without the need for the user to login as frequently.
The OAuth 2.0 client you are using must have REFRESH_TOKEN as one of its grant types, and you would typically use this type in conjunction with another grant type, like CLIENT_CREDENTIALS or AUTHORIZATION_CODE:
{
 "enabled": true,
 "created": "2019-05-23T02:06:20.685Z",
 "name": "My Application",
 "description": "My Application",
 "id": "b61429f5-203d-494c-94c3-04f54e17bc5c",
 "secret": null,
 "grantTypes": [
  "REFRESH_TOKEN",
  "AUTHORIZATION_CODE"
 ],
 ...
}
This is the overall authorization flow:
- The client application receives an
access_tokenand arefresh_tokenfrom one of the other OAuth grant flows, likeAUTHORIZATION_CODE. - The client application detects that the
access_tokenis about to expire, based on theexpires_inattribute contained within the JWT token. - The client submits an OAuth 2.0 token request to IDN in this form:
POST https://{tenant}.api.identitynow.com/oauth/token?grant_type=refresh_token&client_id={client_id}&client_secret={client_secret}&refresh_token={refresh_token}
- IDN validates the token request and submits a response. If the request is successful, the response contains a new
access_tokenandrefresh_token.
These are the query parameters in the OAuth 2.0 token request for the refresh token grant flow:
| Key | Description |
|---|---|
grant_type | Set to refresh_token for the authorization code grant type. |
client_id | This is the client ID for the API client (e.g. b61429f5-203d-494c-94c3-04f54e17bc5c). This can be generated at https://{tenant}.identitynow.com/ui/admin/#admin:global:security:apimanagementpanel. |
client_secret | This is the client secret for the API client (e.g. c924417c85b19eda40e171935503d8e9747ca60ddb9b48ba4c6bb5a7145fb6c5). This can be generated at https://{tenant}.identitynow.com/ui/admin/#admin:global:security:apimanagementpanel. |
refresh_token | This is the refresh_token that was provided along with the now expired access_token. |
Here is an example call OAuth 2.0 Token Request for the Refresh Token grant.
curl -X POST \
 'https://example.api.identitynow.com/oauth/token?grant_type=refresh_token&client_id=b61429f5-203d-494c-94c3-04f54e17bc5c&client_secret=c924417c85b19eda40e171935503d8e9747ca60ddb9b48ba4c6bb5a7145fb6c5&refresh_token=ey...4M' \
 -H 'cache-control: no-cache'
Once you have the refresh_token, you can pass the refresh_token as a basic "Authorization" header in your requests using the OAuth endpoints, allowing your requests to continue to succeed without being affected by the expired access_token.
For more information about the OAuth refresh token grant flow, refer here.
OAuth token response
A successful request using any of the grant flows to https://{tenant}.api.identitynow.com/oauth/token will contain a response body like this:
{
  "access_token": "eyJhbGciOiJIUzI1NiIsInR5cCI6IkpXVCJ9.eyJ0ZW5hbnRfaWQiOiI1OGViMDZhNC1kY2Q3LTRlOTYtOGZhYy1jY2EyYWZjMDNlNjEiLCJpbnRlcm5hbCI6ZmFsc2UsInBvZCI6ImNvb2siLCJvcmciOiJuZWlsLXRlc3QiLCJpZGVudGl0eV9pZCI6ImZmODA4MTgxNTVmZThjMDgwMTU1ZmU4ZDkyNWIwMzE2IiwidXNlcl9uYW1lIjoic2xwdC5zZXJ2aWNlcyIsInN0cm9uZ19hdXRoIjp0cnVlLCJhdXRob3JpdGllcyI6WyJPUkdfQURNSU4iXSwiZW5hYmxlZCI6dHJ1ZSwiY2xpZW50X2lkIjoiZmNjMGRkYmItMTA1Yy00Y2Q3LWI5NWUtMDI3NmNiZTQ1YjkwIiwiYWNjZXNzVHlwZSI6Ik9GRkxJTkUiLCJzdHJvbmdfYXV0aF9zdXBwb3J0ZWQiOmZhbHNlLCJ1c2VyX2lkIjoiNTk1ODI2Iiwic2NvcGUiOlsicmVhZCIsIndyaXRlIl0sImV4cCI6MTU2NTg5MTA2MywianRpIjoiOTQ5OWIyOTktOTVmYS00N2ZiLTgxNWMtODVkNWY2YjQzZTg2In0.zJYfjIladuGHoLXr92EOJ3A9qGNkiG5UJ9eqrtSYXAQ",
  "token_type": "bearer",
  "refresh_token": "eyJhbGciOiJIUzI1NiIsInR5cCI6IkpXVCJ9.eyJ0ZW5hbnRfaWQiOiI1OGViMDZhNC1kY2Q3LTRlOTYtOGZhYy1jY2EyYWZjMDNlNjEiLCJpbnRlcm5hbCI6ZmFsc2UsInBvZCI6ImNvb2siLCJvcmciOiJuZWlsLXRlc3QiLCJpZGVudGl0eV9pZCI6ImZmODA4MTgxNTVmZThjMDgwMTU1ZmU4ZDkyNWIwMzE2IiwidXNlcl9uYW1lIjoic2xwdC5zZXJ2aWNlcyIsInN0cm9uZ19hdXRoIjp0cnVlLCJhdXRob3JpdGllcyI6WyJPUkdfQURNSU4iXSwiZW5hYmxlZCI6dHJ1ZSwiY2xpZW50X2lkIjoiZmNjMGRkYmItMTA1Yy00Y2Q3LWI5NWUtMDI3NmNiZTQ1YjkwIiwiWYNjZXNzVHlwZSI6Ik9GRkxJTkUiLCJzdHJvbmdfYXV0aF9zdXBwb3J0ZWQiOmZhbHNlLCJ1c2VyX2lkIjoiNTk1ODI2Iiwic2NvcGUiOlsicmVhZCIsIndyaXRlIl0sImF0aSI6Ijk0OTliMjk5LTk1ZmEtNDdmYi04MTVjLTg1ZDVmNmI0M2U4NiIsImV4cCI6MTU2NTk3NjcxMywianRpIjoiODliODk1ZDMtNTdlNC00ZDAwLWI5ZjctOTFlYWVjNDcxMGQ3In0.pfDcB0sGChdHk-oDNmiIxsKFLxq9CcPQV5-eXWgIcp4",
  "expires_in": 749,
  "scope": "read write",
  "accessType": "OFFLINE",
  "tenant_id": "58eb06a4-dcd7-4e96-8fac-cca2afc03e61",
  "internal": false,
  "pod": "cook",
  "strong_auth_supported": false,
  "org": "example",
  "user_id": "595826",
  "identity_id": "ff80818155fe8c080155fe8d925b0316",
  "strong_auth": true,
  "enabled": true,
  "jti": "9499b299-95fa-47fb-815c-85d5f6b43e86"
}
You can use the JWT access_token to authorize REST API calls through the IDN API gateway.
To use the access_token, simply include it in the Authorization header as a Bearer token.
This is an example V3 API request that has the access token in the header:
curl -X GET \
 'https://{tenant}.api.identitynow.com/v3/account-activities' \
 -H 'Authorization: Bearer {access_token}' \
 -H 'cache-control: no-cache'
Some of the other values can also be useful to know:
The
expires_invalue describes the lifetime, in seconds, of theaccess_token. For example, the value 749 means that theaccess_tokenwill expire 12.5 minutes from the time the response was generated. The exact expiration date is also contained within theaccess_token. You can view this expiration time by decoding the JWTaccess_tokenusing a tool like jwt.io.The
refresh tokenexists for use in the refresh token grant flow to replace theaccess_tokenwhen it expires. However, therefresh_tokenwill only be present if the API client has theREFRESH_TOKENgrant flow.The
user_idandidentity_iddefine the identity context of the person who authenticated. However, these values aren't set for the client credentials grant type because it doesn't have a user context.
With the JWT access_token, you can now successfully send authenticated IDN API requests. To learn more about authorization and the scopes you can apply to further control access to the APIs, refer to Authorization.
More Information
This section of the document includes additional information about the authentication/authorization process, including some different use cases for the different authorization grant flows.
OAuth 2.0
The SailPoint authentication/authorization model is fully OAuth 2.0 compliant. OAuth 2.0 is an industry-standard protocol for authorization. It provides a variety of authorization flows for web applications, desktop applications, mobile phones, and devices. This specification and its extensions are developed within the IETF OAuth Working Group.
JSON Web Token
The issued JWT access_token leverages the JSON Web Token (JWT) standard.
JWT is an industry-standard protocol for creating access tokens which assert various claims about the resource who has authenticated.
The tokens have a specific structure consisting of a header, payload, and signature.
A raw JWT might look like this:
eyJhbGciOiJIUzI1NiIsInR5cCI6IkpXVCJ9.eyJ0ZW5hbnRfaWQiOiI1OGViMDZhNC1kY2Q3LTRlOTYtOGZhYy1jY2EyYWZjMDNlNjEiLCJpbnRlcm5hbCI6dHJ1ZSwicG9kIjoiY29vayIsIm9yZyI6ImV4YW1wbGUiLCJpZGVudGl0eV9pZCI6ImZmODA4MTgxNTVmZThjMDgwMTU1ZmU4ZDkyNWIwMzE2IiwidXNlcl9uYW1lIjoic2xwdC5zZXJ2aWNlcyIsInN0cm9uZ19hdXRoIjp0cnVlLCJhdXRob3JpdGllcyI6WyJPUkdfQURNSU4iXSwiY2xpZW50X2lkIjoibktCUE93akpIOExYU2pJbCIsInN0cm9uZ19hdXRoX3N1cHBvcnRlZCI6dHJ1ZSwidXNlcl9pZCI6IjU5NTgyNiIsInNjb3BlIjpbInJlYWQiLCJ3cml0ZSJdLCJleHAiOjE1NjU4ODgzMTksImp0aSI6ImM5OGQxMjM2LTQ1MTMtNGM4OS1hMGQwLTBjYjlmMzI3NmI1NiJ9.SAY4ZQkXGi2cY_qz57Ah9_zDq4-bnF-oDJKotXa-LCY
If you were to decode the access token data, it might look something like this:
- Header
- Payload
- Signature
{
  "alg": "HS256",
  "typ": "JWT"
}
{
  "tenant_id": "58eb06a4-dcd7-4e96-8fac-cca2afc03e61",
  "internal": true,
  "pod": "cook",
  "org": "example",
  "identity_id": "ff80818155fe8c080155fe8d925b0316",
  "user_name": "slpt.services",
  "strong_auth": true,
  "authorities": ["ORG_ADMIN"],
  "client_id": "nKBPOwjJH8LXSjIl",
  "strong_auth_supported": true,
  "user_id": "595826",
  "scope": ["read", "write"],
  "exp": 1565888319,
  "jti": "c98d1236-4513-4c89-a0d0-0cb9f3276b56"
}
HMACSHA256(
base64UrlEncode(header) + "." +
base64UrlEncode(payload),
{secret}
)
You can check the JWT access token data online at jwt.io.
Grant flow use cases
This section describes some different use cases and which grant flow you would want to use for the different cases.
Daily work or quick actions
For daily work or short, quick administrative actions, you may not really need to worry about grant types because you can easily generate an access token in the user interface (UI).
Follow these steps to do so:
- Login to IDN.
- Go to
https://{tenant}.identitynow.com/ui/session. - The
accessTokenis visible in the UI. - Use this access token in the
Authorizationheader when you're making API calls. If the access token expires, log back into IDN and get the new access token.
While this is simple to use, the disadvantage is that the accessToken is only valid for a few minutes.
Postman
Postman is a popular HTTP client you can use to design, build, test, and iterate your APIs. Postman users and teams can create public workspaces they can use to make it easy to access their API collections and environments and get started. SailPoint maintains a public workspace for the IdentityNow API collections. You can use this workspace to access all the IDN API collections and stay up to date.
If you're using Postman, you have some different ways to set up your authorization. You can just leverage the accessToken as mentioned above, or you can configure Postman to use OAuth 2.0 directly. For more information about how to do so, refer here.
Web applications
If you are making a web application, the best grant flow to use is the Authorization Code grant flow. This will allow users to be directed to IDN to login and then redirected back to the web application through a URL redirect. This also works well with Single Sign-on (SSO), strong authentication, and pass-through authentication mechanisms.
SailPoint doesn't recommend using a password grant flow for web applications because doing so would involve entering IDN credentials in the web application. This flow also doesn't allow you to work with SSO, strong authentication, or pass-through authentication.
Scripts or programs
If you are writing scripts or programs that leverage the IDN APIs, the OAuth 2.0 grant you should use typically depends on what you're doing and the user context you need to operate under.
Because scripts, code, and programs lack an interactive web-interface, it is difficult, but not impossible, to implement a working authorization code grant flow.
Most scripts and programs use the Client Credentials grant flow. If your APIs can work under an API context without a user, using client credentials is ideal. However, if your APIs need a user or admin context, you should use a PAT approach.
Troubleshooting
Having issues? Follow these steps:
Verify API endpoint calls
Verify the structure of the API call:
Verify that the API calls are going through the API gateway:
https://{tenant}.api.identitynow.comVerify you are calling their version correctly:
- Private APIs:
https://{tenant}.api.identitynow.com/cc/api/{endpoint} - V2 APIs:
https://{tenant}.api.identitynow.com/v2/{endpoint} - V3 APIs:
https://{tenant}.api.identitynow.com/v3/{endpoint} - Beta APIs:
https://{tenant}.api.identitynow.com/beta/{endpoint}
- Private APIs:
Verify that the API calls have the correct headers (e.g.,
content-type), query parameters, and body data.If the HTTP response is 401 Unauthorized , this is an indication either that there is no
Authorizationheader or that theaccess_tokenis invalid. Verify that the API calls are providing theaccess_tokenin theAuthorizationheader correctly (ex.Authorization: Bearer {access_token}) and that theaccess_tokenhas not expired.If the HTTP response is 403 Forbidden, this is an indication that the
access_tokenis valid, but the user you're running as doesn't have access to this endpoint. Check the user's associated access rights.
You can also get a 403 Forbidden response error when you call an API that expects a user, but your authorization grant type lacks a user context. Calling most admin APIs with a CLIENT_CREDENTIAL grant often produces this result.
Verify OAuth client
- Verify that the OAuth 2.0 client is not a legacy OAuth client. Legacy OAuth clients will not work. This can become very apparent when you look at the client ID - OAuth 2.0 client IDs have dashes. Here are two examples that illustrate the difference:
Legacy Client ID: G6xLlBBOKIcOAQuK
OAuth 2.0 Client ID: b61429f5-203d-494c-94c3-04f54e17bc5c
- Verify that the OAuth 2.0 client ID exists. You can verify this by calling this endpoint:
GET /beta/oauth-clients/{client-id}
or
GET /beta/oauth-clients/
You can also view all of the active clients in the UI by going to https://{tenant}.identitynow.com/ui/admin/#admin:global:security:apimanagementpanel.
- Verify that the OAuth 2.0 client grant types match the OAuth 2.0 grant type flow you're trying to use. For example, this client will work with Authorization Code and Client Credentials grant flows, but not Refresh Token flows:
{
 "enabled": true,
 "created": "2019-05-23T02:06:20.685Z",
 "name": "My Application",
 "description": "My Application",
 "id": "b61429f5-203d-494c-94c3-04f54e17bc5c",
 "secret": null,
 "grantTypes": [
  "AUTHORIZATION_CODE",
  "CLIENT_CREDENTIALS"
 ],
 ...
}
- If you're using an Authorization Code grant flow, verify that the redirect URL(s) for your application match the
redirectUrisvalue in the client. You can check this by calling the List OAuth Clients endpoint.
Verify OAuth calls
Verify that the OAuth call flow is going to the right URLs, with the correct query parameters and data values.
A common source of errors is using the wrong host for authorization and token API calls.
The token endpoint URL is {tenant}.api.identitynow.com, while the authorize URL is {tenant}.identitynow.com.